Tuesday, April 24, 2012

DEF

Hello, it's Mr. and Mrs. here with our 3 latest alphabet dates.  Nothing too "flashy", but they are keeping us creative and intentional about ways to spend more quality time together. 

D~ We were actually able to have a date night without Little Miss a few Fridays ago in a part of town that we don't get to nearly enough.  We tried a new restaurant (for us) called Dickey's BBQ.  The service was quick, food was good, and they had really good fountain Diet Coke. :)  The Mrs. also had a gift card leftover from her bday to DSW so we stopped there.  She was able to find her first ever pair of shoes from that store. Shoe shopping is not something we often do together, but we had a great time.
cute, huh?


E~ We had a little help from the holidays for this one.  We dyed Easter eggs, and went on an Easter egg hunt.  Nothing too creative there, but it was Little Miss's first experience with both, so we had a blast!

 F~ Those of you that know us well, know that we both love football.  Thursday, April 26th, is the football draft, so we have some fun plans in store!  Of course we're going to watch it, but that seems a little boring, so Mr. has made a game that we're going to play throughout the evening....DRAFT-O.  Played basically like BINGO.....we each have to fill out our card with players that we think will get drafted first.  First person with a blackout, WINS!  The Mrs. has also taken some of our favorite football food, and found some new (*somewhat healthier) versions of them for us to munch on during the evening as well.  We're excited!

There you have it!  Up next, G, H, I.  We have heard from a few of you that have started doing this as well, and would love to hear how it's going!  And, as always, we would love any ideas for upcoming letters.  
 
If you're just joining us now, here's what we did for our ABC Dates.  Happy dating!

Sunday, April 22, 2012

DIY Workbench

Hey everyone.  It's the Mr. here.  Sorry I haven't been here in a while, but I'm back with some tips on how to make a DIY workbench for your garage.  Our garage is not huge, so I needed a space where I could work, and also help to organize our garage space a little better.

Here's a before shot....notice all of the random things accumulating around my tool boxes!

1.  Find a top you want to use.  I found an old counter top from a kitchen, but you can pick up some High Density Particle Board (HDP) from your local hardware store.  Cut it to a size you want and put some 2X4 or 2X6's around the ends for a frame.  Glue the bottom of the boards, clamp them together with the bottom of the table, and screw the two together. Be sure to screw from the bottom up.  You don't want to cut a hole in your table top.


2.  Cut your legs to your desired height.  Take a 2X4 and screw it to another 2X2.  Do this four times, one for each leg.  This allows an easy fit into the frame on the bottom of the table.  If you want to add a shelf to your bench, screw another piece of 2X2 in the corner of each leg so the shelf can rest on it.  Number each leg and frame just in case you need to take it down. (more on this later).


3.  If adding a shelf, find a scrap piece of plywood, measure and cut it according to the inside of your frame on the bottom of the table.  Pre-drill the plywood because it can split easy.  Screw the plywood into another frame of 2X2s.  This can rest on the inside of the legs you made earlier.  Screw the sides of the legs into the frame of the shelf to pull it together. Screw the back frame into the studs of your garage wall for extra support.


4. Vice (optional).  Determine where you want the vice on the bench and mark the four holes with a pencil.  Drill a hole through the table big enough to fit a 3/4 inch bolt.  Screw the nut and bolt together with the Vice attached.  


 The finished product:  A nice-sized work bench for me to work on, and a more organized garage.

The shelf pictured above my bench (pic on the right) is the poor man's shelf that I blogged about before.


Saturday, March 31, 2012

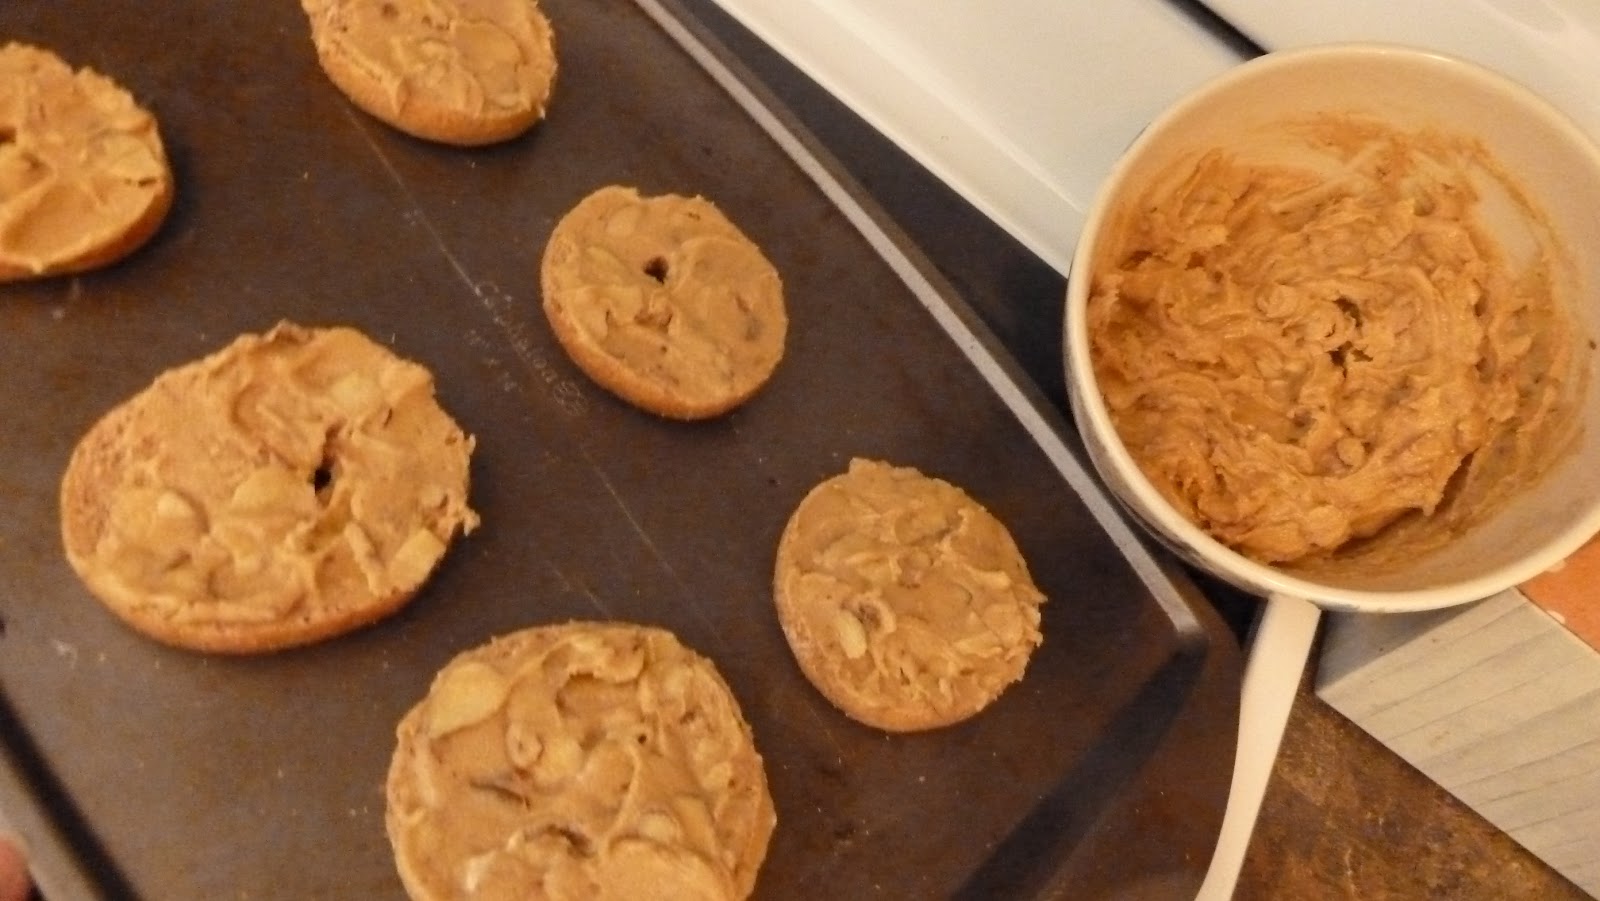
Caramel Crunch Bagels

It's the Mrs. here, with one of my FAVORITE, EASIEST recipes!!!
I have made this so many times, for so many different types of events, and it's always a hit.  Plus, these are ingredients that people usually have around the house so you can make it on a moment's notice.  Girlfriends coming over....coffee and caramel crunch bagels!  Family staying for the weekend......caramel crunch bagels for everyone!  Big day at the office for the Mr. and need a "special breakfast"......caramel crunch bagels!  Hosting book club.....well...you get the idea.  
mix, spread onto bagels before broiling
3/4 cup brown sugar
1/2 cup butter
2 Tb. honey
1/2 tsp. cinnamin
**sliced almonds, optional**
Spread onto bagels and broil until bubbling
A few tips:
1. It depends what you're serving these for, but I honestly like serving them on mini bagels best (i also use whole wheat because then I can tell myself they are healthy-ish-ha!).
2. It mixes and spreads best if the butter is softened (room temp), and not melted.

done!
(my camera and picture taking ability
don't do these justice)
3. If you are making this for a family breakfast (as I often am) and don't use all of the mix, have no fear!  Just put it in the frige, and soften again the next time you want to use it.  If you plan on doing this, I would wait to mix the almonds in so that they don't get mushy.
4. Use a cookie sheet with sides if possible.  If you don't have one, I would recommend putting foil, or another large cookie sheet below....the caramel topping tends to run a little as they are broiling and makes a very sticky mess if it spills all over your oven. :)

That's it!  Really!  I think I might go mix up a batch of these right now.....what are you going to make these for?  I'd love to hear!

....if you missed it, another fun and easy recipe is cake in a cup...

Sunday, March 25, 2012

Outdoor Tip #3

It's the Mr. here with a short, Spring tip for all you deer hunters out there.  I've been anxiously waiting for Fall and have been doing some research to pass the time.  Now is a great time to go out on your hunting property and make some mock scrapes.  "Scrapes" is a term used to determine markings on trees when a buck rubs his antlers on the bark as a sign of territory during the rut.  Hunters use scrapes as a sign that at least one buck is in the area.  The larger and higher the scrape on the tree, the larger the buck.  Bucks also lick the edges of tree branches to mark their territory. They visit scrapes year-round, so hunters can go out and make mock scrapes to attract bucks to a certain area near their trail camera.  Just take a deer antler (or something similar to it's size, shape and durability) and rub the antler on the sides of trees about 5 - 6 feet high.  Rip off some bark along the edge of some branches of the same tree to show signs of licking.  Finally, put some buck urine on the ground for other bucks to smell.

Early spring is a great time for this because the lack of foilage (leaves) makes it easier for the deer to see your fresh scrapes.  Pick spots at or near water (streams, lakes, ponds etc).  A mock scrape will bring velvet bucks to the area of your trail camera all summer long, and can start a pattern that can increase your chances of seeing more deer in the fall.

One more quick tidbit.  We just purchased some minerals to see if they attract bucks to our property.  Minerals are a great way to help increase antler size.  There's several different types of mineral, so you'll have to do some research on what works for your area.  I read some reviews online and we ended up going to our local Gander Mountain to purchase Trophy Rock All Natural Mineral Lick.  It's a 12 lb.  life size rock that looks exactly like a rock.  We also purchased a 20 lb. bucket called Lucky Buck Mineral.  We'll just spread the mineral grain along the ground, stumps, and rocks.  We'll put these near trail cameras so we'll let you know if we see anything. 

Tuesday, March 20, 2012

MINE!!!

Mrs. here with a somewhat reflective post. :)  Nothing new or profound, but just struck me today.
Over the past few days, Little Miss's new (and favorite) word is "MINE!".  Everything that she can see or put her hands on she proudly shouts "MINE!".  She finds a toy or snack, gives a possessive squeeze and shouts "MINE!"  A little friend wants her doll, she holds on tight and shouts "MINE!"  I mean, this is not one of those words that we work so hard on getting her to say. It can take days to get her to say sweet things like "love you"....yet somehow by watching me, watching the world, she has learned this simple word and it's meaning.

For some reason, watching her in this new stage brought some conviction to me today.  The stuff that Little Miss is so possessive of is not really hers.  Yes, we have given it to her to enjoy or use, but we (like any other parent) want her to share....her snack, her toys, her books, etc... But I realized that this is the way I live so often.  Just like we provide for Little Miss's needs (and many of her wants) my Heavenly Father is doing the same for me.  He has generously provided for me in so many ways....and yet when someone with a need comes my way, instead of sharing, I just give my stuff a possessive squeeze and shout "MINE!".  Someone needs me to share my time, my resources, or something that isn't convenient and I just stand there and shout "MINE!"  Again, I'm sure this is not a new or profound thought to anyone, but I want to use this opportunity.  When I work with Little Miss on learning to share, I'm hoping that God can continue to work on me and ways that I can share as well.  Gotta' love how much a God can teach me through a toddler! :)

Saturday, March 17, 2012

Outdoor Tip #2


It's the Mr. here with an overdue post about my newest outdoor tip: don't buy it, if you can make it for less.  To illustrate this tip, I'm going to show you my latest endeavor.  I've been trying to get a little more into building my own fishing lures.  I've built some with friends and am trying to accumulate a few things here and there to accomplish this.  The first thing you need is the vice.  Some vice's go for up to $100, so I thought I would try to make one for a fraction of the cost.  I found a 4-inch C-clamp and a needle-nose vice grip.  The next step is to weld  a 1/4 inch rod to the C-clamp and to the vice grips. (No problem if you don't have a welder....just borrow.  I used a relatives, and it took us just a few minutes.)  Finally, I bent the top end of the rod at a 90 degree angle to give the weld a little more support on the vice grips.  Done!  Not only was I able to make this tool for less than the cost of buying it, but I will be able to make my own lures as well.
90 angle weld on vice grips


Finished product

Monday, March 12, 2012

ABC Dates

Hello everyone!  It's the Mr. and Mrs. here, back after a brief hiatus from blogging after a couple of vey busy weeks.

We already blogged about what we did for our "A" dates (see post about dating a-z).  Now onto B and C.  We had to combine these into a couple of nights to plan around our anniversary and babysitters, but we still managed to check both letters off our list.  Here's what we did:

On our actual anniversary day, I (Mrs.) got 4 Calalillies (one of my favorite flowers, and the first time Mr. had gotten them for me!!!) in honor of our 4 years of marriage.


Then we took Little Miss to Cold Stone for dessert...as you can see, she was less than thrilled about waiting for her ice cream until after a picture.
The next evening we visited an Asian Bistro.  The food was amazing, and it was fun to try out a new spot.  We finished the night by watching Courageous, which if you haven't seen, you must watch some time. And there you have it!  Nothing too crazy, but it got us thinking outside the box for what we might normally do.  We've already got a few ideas for upcoming letters, but could use a little help with ideas for D and E.  If you have any, post some in the comments! 

Sunday, February 26, 2012

Dating A-Z

Hello, it's Mr. & Mrs. here! 

In a few short weeks we will be celebrating our 4th anniversary-yay! As we enter into our fifth year of married life, we decided that a fun challenge was in order for this year....dating our way through the alphabet!  We can't remember where we first read this idea (it was in some sort of marriage/relationship book) but we thought it was really clever.  So here's our challenge: to have a date with each letter of the alphabet before our 5 year anniversary.  Because of the stage of life we're in, we are going to allow Little Miss to come on some of these dates too. :)  We are also going to make it a goal to get creative with our ideas so that we can try some new things and places, but hopefully not spend lots of money either.  We are open for suggestions, so add some comments if you have any ideas for us!  Feel free to join in our challenge as well....whether you're newlyweds, have a busy house full of kiddos, or single, this challenge is really about being purposeful in spending time and making memories with the ones you love.

We are starting with A today....heading to Applebee's for supper (those who know us well, know that we of course have a gift card!).  Then we are going to have Angelfood cake for dessert at home, and play Apples to Apples.  We've always wanted to go to Alaska (which is definitely out of our budget and time restraints right now), so instead we're going to finish the night by watching a documentary of Alaska that we borrowed from the library.  There you have it! :)

Remember, let us know if you have any creative ideas for us to try for various alphabet letters, or if you are joining in this challenge with us! We'd love to hear from you. :)

Wednesday, February 22, 2012

Party Tips

Hello :)  Mrs. here!

Those of you that know me personally, know that I love to host!  Doesn't matter if it's 1 person, or a group of people, I just enjoy openning our home to whoever.  Especially when it's more of a "party" format....I love finding themes, decor, treats, favors, or whatever.....all to make people feel comfortable and welcome.  Recently I held a small party in my home and just thought I'd pass along a few tips that I used to play up the theme and save on the budget too. :)

1. Make lists.  Determine how many people are coming (I always add a couple in case there are last minute guests that come) and from there you can more accurately plan what you need from food, to paper products (if using), to seating!

2. Use what you have FIRST, shop LAST. Because this was a smaller gathering and I knew that I had most of what I needed from my lists (see tip #1) I didn't even go shopping until the day before the party.  Here are a few of my own things that I found a way to use.....

~I'm not sure where I saw this idea (if I find it again I'll pin it) but I took a bunch of vases and glasses from my cupboard and covered them with my Valentine socks for some festive table decorations!

~Instead of buying a table cloth, I used some heart napkins that I had from last year's V-day, as well as some heart tissue paper underneath the food table.....voila! 

~I'm also a big fan of clear dishes. They go with ANYTHING.  I used clear coffee mugs, as well as some clear bowls for candy.....cost: $0


3. Use your food as decoration.  This might sound silly, but if you're throwing a party with a theme, there's usually no need to spend money buying, or time making decorations because your food can do the work for you!  I found this cute pretzel idea on Pinterest. I already had the almond bark and some sprinkles so the total cost for this snack was just a couple dollars.  (a side tip, don't over-prepare food....I am usually guilty of having too much food, but am trying to be better so I don't waste it!)  I also used Valentine's candy (which was on clearance-wahoo!) on the table that everyone was seated around for people to munch of during the party.  Simple! 


Here's a glimpse at the "finished product" (which I'm sure would look a lot better if I was a gifted photographer--ha!).  On this entire table, the only things I purchased were the pretzels, valentine-themed muffin cups (I only used 8 because it was a small party, so saved the rest for next year), and the trail mix. Total cost: about $5.  I was even able to use the "love" that Mr. gave me for Valentine's Day 5 years ago on the table. Awwww!!!!  :)

None of these ideas are earth-shattering, and I'm sure you have some even better tips than these for throwing parties.....I would love to hear them!  Just hoping that these basic tips can either inspire you to invite someone over if you haven't in a while, or to save you a little stress and money if you're a frequent host!


Friday, February 17, 2012

Happy (belated) Valentines Day

It's the Mr. here. 

My wife and I went to see The Vow for Valentines Day.  It was the first movie we'd been to in a while, and it was great, although a little hard for me at times.  The Vow is the story of a couple that gets into a car accident.  The wife loses all memory of her husband, and they have to fall in love all over again.  Can you imagine?  As a husband, this was hard for me because I honestly don't know what I would do without my family.  He even had to try to explain to her what she was like as a person before the accident; all of those "little things" that made her who she was.  It's a sad, but true story so it really got me thinking about how husbands need to continue "dating" thier wives.  On the way home, my wife and I talked about how we thought we would handle that situation, what we would tell each other about our different qualities if that ever happened, and what we would do to fall in love all over again.  It was a good conversation and we had fun reminicing about how we fell in love.

So take this time to talk to your spouse about how you would fall in love all over again; what kind of dates you would go on, what each others' tendencies are, etc....  And men, remember to never stop dating your wife.

Sunday, February 12, 2012

From Socks to Legwarmers :)

Mrs. here, solving 2 problems with 1 easy fix. :)

Problem #1...the Mr. wears out his socks like crazy!  Sometimes these holes could be fixable, but often times they are large holes worn through on the bottom.  Since I am not a master seamstress (bummer!), this is a little beyond my skill (and patience) level.


Problem #2...Little Miss has quite a few clothes that fit her right now, but many are more appropriate for Spring weather so she wears a lot of tights.  On very cold days, tights just don't seem to be enough to keep those chubby little legs warm.

Solution....turn Mr's worn out socks into legwarmers for Little Miss!  I'm sure many of you have already thought of this idea, but it was a lightbulb moment for me!  This is so easy my toddler could almost make these for herself! :)

Take a worn out pair of socks (if they are your Mr's be sure you ask first!)

Cut them off evenly with a good scissors...this will make
the cuts more smooth, and prevent a lot of freying.  I chose to
cut below the heel because of Little Miss's height,
but you'll just have to gauge this for yourself.

Voila!  Instant legwarmers!  (not sure if you
can tell in this pic, but I rolled the bottoms
of the socks under so that you can't see the
raw edge where I cut them off.)

Cute, huh?!?
Now go on and start digging through your sock drawer so you can make a pair! :)

Friday, February 10, 2012

Workout Challenge

The Mr. here: My wife and I have been needing some extra motivation to work out, especially since we're so busy with work, piano lessons, and our 14 month old daughter.  So we decided to make a game plan.
      I just bought a new hunting bow (well new to me, it's a 2005) so I'm super pumped to begin shooting it.  I bought it used from a guy who knows a ton about bows, and took good care of it.  It came with everything so I saved a ton of money.  The thing is my wife and I made a deal that I can't shoot it until I "pay it off" by working out.  I earn $5.00 every time I work out towards paying off the bow.  If it's a busy day and all I have time for is taking a walk at lunch, I earn $2.50.  I keep track of my earnings until I reach the total of the bow!
        I decided that I shouldn't be in this alone, so I made the Mrs. pick a goal too.  She decided to earn "time to herself".  Everytime she works out she earns 5 minutes, or if it's just a walk with the kiddos, she earns 2 1/2 minutes.  She can work towards time away with girlfriends, time at home to work on projects or crafts, or just go for a cup of coffee somewhere.  So far I'm beating her, but who knows....I may not be shooting until the season opener while she's drinking a chocolate mocha!
        The real goal is to keep us healthy, so hopefully we'll be able to post an update about this in a few months about how buff and toned we are just in time for summer.....but we'll see!

What do you do to stay motivated to work-out and keep in shape?